
The mobile app development industry is at its highest, thanks to the ever-increasing demand for mobile apps. However, people are also starting to get along with web apps thanks to React 18. This latest JavaScript library allows developers to build web apps with native mobile app-like experiences. However, among its many updates and features, Its improved proficiency at Server Side Rendering (SSR) stands out the most. But what is React Server Side Rendering, and above all, how can users benefit from it? To find all that out, let’s React Server Side Rendering in this blog. So, without any further ado, let’s get straight into it.
What Is Server Side Rendering?
Server Side Rendering, also known as its short form SSR, is a technique of React JS development for the web whereby a server, and not the client’s browser, does the rendering for the first view of a webpage. For React applications, it entails rendering React components on a server and then sending that HTML markup to the client later. Moreover, this method has a number of advantages over client-side rendering, including improved first-page load, better search engine optimization, and better performance on low-powered devices.
Therefore, when developers create React app with SSR, the server sends it to the client. So, by the server sending it to the client, the user can actually see data or content instantly, even before the JavaScript is loaded. Moreover, this gives dramatic perceived performance boosts to the web application, especially for those with slower connections. Moreover, SSR will allow search engines to crawl and index your content more easily, potentially enhancing your site’s visibility in search results. While implementing SSR can be more complex compared with traditional client-side rendering, its benefits outweigh the challenge for many web applications.

What’s the Difference Between SSR and CSR?
Server Side Rendering and Client Side Rendering are two ways by which the process of rendering web content takes place. In React server-side rendering, the server processes and renders the initial HTML for sending a fully formed page to the client. Furthermore, this helps in faster initial load times and better SEO. On the other hand, Client Side Rendering (CSR) relies on the ability of the client’s browser to render the page using JavaScript.
This means that the server-side rendered app provides more dynamic interactivity and reduced server load. On the other hand, the client-side react app without SSR may slow down the initial page load. Client-side routing can also pose challenges to SEO. However, server-side rendering in React plays very well in fast content delivery and is a friend to search engines. Furthermore, SSR can run the application with instant content delivery and create highly interactive app-like experiences. The choice between an SSR and a client-side javascript rendering depends on what is required by your web application.

Benefits of Using React Server Side Rendering
Rendering web pages on the server has a lot of benefits, which makes it the preferred choice for React developers. Some of the benefits that come with React Server Side Rendering are as follows:

SEO:
React Server Side Rendering (SSR) enhances efforts for its users in the domain of Search Engine Optimization (SEO). It doesn’t do what client-side rendering does, which is to provide under-rendered content to the crawlers. In contrast, it serves fully rendered HTML on the server or CSS content to search engine crawlers for easier indexing of pages.
Moreover, this will result in better search rankings and organically higher traffic. SSR can also expose all of your content to search engines instantaneously, including dynamic content that might get missed out in a client-side rendered app. Moreover, SSR can provide better social media sharing by correctly creating meta tags and Open Graph data for better link appearance on a variety of platforms.
Performance:
React Server Side Rendering allows the app to provide a faster performance specifically in faster page loads. If the content is used to render on the server, it will be first visible to the users. This way, users would be able to view and use the server-rendered page sometime before their JavaScript download is complete. Hence the SSR app can benefit users using poor internet or less powerful devices.
The actual perceived improvement SSR brings is the reduction of time-to-first-paint and time-to-interactive for your application. Moreover, SSR detects a drop in the total load on the client’s device since most of the rendering work is actually moved to the server. Therefore, this creates a smoother user experience and UI by providing a performant first-load experience, particularly with complex applications or websites rich in content.
Single Page Application (SPA):
Traditional Single Page Applications use client-side rendering. However, implementing SSR in React SPAs combines the best of both worlds. Also, SSR allows SPAs to break through traditional weaknesses like poor initial loading and SEO challenges. Now, with SSR, your React SPA will deliver a fast initial page load, allowing users to see content instantly.
It can then hydrate into a fully interactive SPA, maintaining the same smooth, app-like navigation users expect. Moreover, this hybrid approach ensures that you get improved SEO from your SPA, faster initial renders, and better performance on low-powered devices. At the same time, you do not lose the dynamic interactivity of a client-side rendered application.
Web Development:
Using React SSR for frontend development can radically simplify and enhance the process of developing a web application in various ways. It encourages developers toward thinking about the performance and SEO right from the beginning, hence leading to well-architected applications. Sometimes, SSR even might ease the process of authentication and authorization since this can be managed on the server before sending any content to the client.
That way, the codebase can also be more consistent between the server and the client because both are implemented with the same React components. Implementing SSR is really complex, but at the same time, you often get a more robust and scalable application. In addition, most modern frameworks and toolchains already have SSR out of the box today. Therefore, these features lower the complexity of the implementation. Moreover, this allows developers to really focus on building great user experiences.
How to Implement React Server Side Rendering API
You can implement React server side rendering through the “renderToPipeableStream” API in nine easy steps, which are as follows:
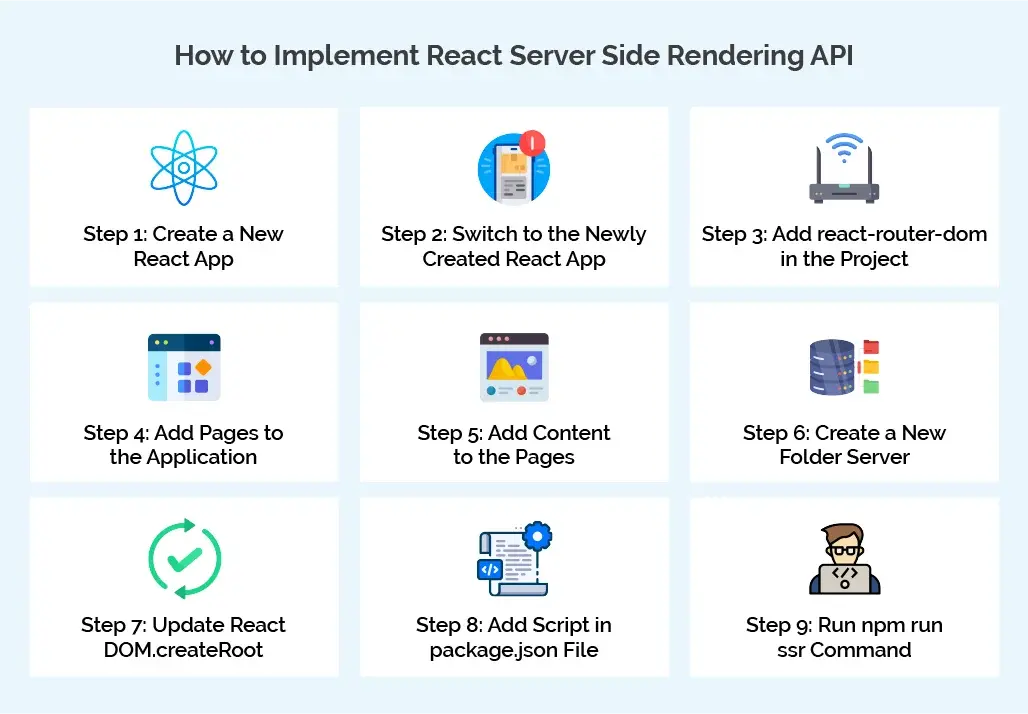
Step 1: Create a New React App
The first step in implementing React server side rendering is to create a new React application. Furthermore, this can be done using the create-react-app command line tool. Moreover, you’ll also see a terminal that you will need to open and then write a command, which is as follows:
npx create-react-app server-api-demo-appStep 2: Switch to the Newly Created React App
The next step is to switch to the React app that you just created using the command. For switching, you will need to use the server code below:
cd server-api-demo-appStep 3: Add react-router-dom in the Project
After switching, you must now add react router dom to your project. Furthermore, this will allow it to handle routing. For this, run the following command:
npm install react-router-domStep 4: Add Pages to the Application
In this step, you will need to add two pages to the app project. As for the app.js, you will need to add the sample routes as added below:
- Home
- About
const App = () => (

<div>

<Routes>

<Route path="/" element={<Home />}></Route>

<Route path="/about" element={<About />}></Route>

</Routes>

</div>

);
Step 5: Add Content to the Pages
Now, it’s time to add content to the pages you just added. You can do so using the command below:
import React, { Suspense } from "react";

const HomeModule = React.lazy(() => {

return new Promise((resolve) => setTimeout(resolve, 2000)).then(() =>

import("./components/HomeModule")

);

});

const Home = () => {

return (

<Suspense fallback={<p>Loading...</p>}>

<HomeModule />

</Suspense>

);

};

export default Home;
Step 6: Create a New Folder Server
Once you have added content, you will then need to create a new folder server at the root level. After that, you will need to create a file index.jsand server.js in that folder. Furthermore, you can use the code we have mentioned below to copy and paste it into the created file.
// server/index.js

require("ignore-styles");

require("@babel/register")({

ignore: [/(node_modules)/],

presets: ["@babel/preset-env", "@babel/preset-react"],

});

require("./server");
The above mentioned code fragment sets up Babel for code translation. However, it also refines and filters out a few distinct files that are in “node_modules”. Moreover, it fires up the server. It launches the server by means of importing the “server” module. This set of settings is usually used in React server-side rendering. That is because it enables the server to process and therefore serve React components to clients.
// server/server.js

import express from "express";

import React from "react";

import ReactDOMServer from "react-dom/server";

import { StaticRouter } from "react-router-dom/server";

import App from "../src/App";

const app = express();

app.get("/*", (req, res) => {

const entryPoint = ["/main.js"];

const { pipe, abort: _abort } = ReactDOMServer.renderToPipeableStream(

<StaticRouter location={req.url}>

<App />

</StaticRouter>,

{

bootstrapScripts: entryPoint,

onShellReady() {

res.statusCode = 200;

res.setHeader("Content-type", "text/html");

pipe(res);

},

onShellError() {

res.statusCode = 500;

res.send("<!doctype html><p>Loading...</p>");

},

}

);

});

app.listen(3002, () => {

console.log("App is running on http://localhost:3002");

});
As for the code above, this one defines a route handler for all routes using app.get(“/*”, …). Moreover, this suggests that this route handler is more than capable of handling all sorts of requests that are coming to the server.
Step 7: Update ReactDOM.createRoot
The next step is for the client side. On it, you will need to update ReactDOM.createRoot with ReeactDOM.hydrareRoot in the index.js file. What this will do, in return, is make the server-generated HTML interactive. You can do so by using the code below:
// index.js

import React from "react";

import ReactDOM from "react-dom";

import { BrowserRouter } from "react-router-dom";

import App from "./App";

ReactDOM.hydrateRoot(

document,

<React.StrictMode>

<BrowserRouter>

<App />

</BrowserRouter>

</React.StrictMode>

);
Step 8: Add Script in package.json File
The second last step is all about running the code on the server side. To do this, you will need to add a script that we have mentioned below in the package.json file. Moreover, the command below will not only build your project but also run the code on the server side. It will do so by generating the output on localhost:3002. The command is as follows:
"ssr": "npm run build && node server/index.js"Step 9: Run npm run ssr Command
The final step is to run a command that will allow you to see the output and make your app up and running in no time. This step is mentioned below:
Run the command:
npm run ssrFinal Thoughts
So, there you have it. That is how you can render a React app on the server side. Moreover, we have mentioned all the benefits of React server side rendering. There are also other frameworks that support re-render on the client and server side like React. Also, framework like Next.JS and Node.JS are great to render pages using WebPack, as many Dev experts have come up with a better command to fetch data from an API and import our app. However, React Docs is a placeholder as React will preserve JavaScript code and JavaScript bundle the best. If you enjoyed reading this blog, we suggest you check out more of our blogs from our website.